Welcome Note
Welcome to Meetu's Desk. Please do subscribe to the channel and give a thumbs up if you like the article. Today we will be talking about one of the most popular App from Google i.e. Google Docs. As we know time to time we need to create documents or I can say text-based documents for which I do use MS Word by Microsoft or open office maybe office 365 for that matter Google docs
It is very necessary or it makes it very important for us to know about google docs or what features google docs provide us why I shall choose Google Docs over Microsoft Word or any text processor or word processor
Advantages of using Google Docs
It is a free alternative to Microsoft Word.
Docs is compatible with Word documents
Docs provides a way to save revisions or edit history so we never lose our work
Google Docs runs as a website in a Web browser -- we do not need to install any application on a computer.
As we use Docs through the Internet it enables us to work on any Internet-connected computer or device [such as Tablets, Mobile Phones]
One of the most highlighted features of Google Docs is that it allows multiple users to work on a document simultaneously and see changes in real-time.
Docs supports the integration of Google's other office programs, such as Sheets and Slides, but there are no Google equivalents for the more advanced Office programs, such as Publisher, Access or Visio.
Disadvantages of Google Docs
It does not support multiple columns.
image-editing support is not provided by Docs
Active Internet connection is compulsory for Docs to runs, due to which it has limitations to file availability
Docs do not provide the facility to directly link to Outlook data to perform a mail merge neither it can read information on the calendar.
How to create new Google Doc
Prerequisite:
You must have an account which has access to Google Drive or Google Services / Products
You must be logged in to your account
Go to Google Drive
Steps to Create a New Doc
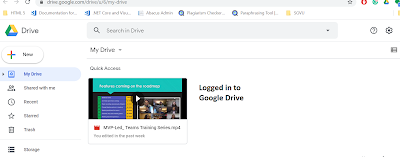
As we have talked about the prerequisite, I have already logged on to my Google Drive using my Google account. This is the root directory or root folder of my drive.
Logged in to Drive:
Now let’s start creating a new Google Doc. For that we have two ways
First I can click on to this New button and it will display a sub-menu with all possible option

Alternatively, I can click on the dropdown arrow icon on My Drive, it will also display the same option as a submenu
From here I can go to Google doc and point to the arrow as soon as I point to this arrow it will display two options: blank document and from a template for this tutorial we will be sticking to blank documents let’s click on a blank document.
A new tab will open with the title “Untitled Document-Google Docs”. This opens in Google Docs with its default name. Now let’s change the name of this newly created document to “My First Doc”. To change the name we will do single left Mouse click this will select the current name of the document now delete the current name and start typing a new name, in this case, My First Doc and now perform a single left click anywhere outside it will autosave or more precisely rename the doc with the new name. To check the status of the document click on the cloud icon near the name of the document it will let us know that document is saved or not. As we have discussed in the advantages of Google docs that it saves the history of edit versions or revisions done by oneself or others, we can see that it was last edited a second ago. We can click on this link which says when it was last edited, and it will display the history of edits. As I have just created this doc so I am not clicking the link. When we have created this document or renamed this doc it has not asked for the directory or location where to store this document. This document is stored at the root directory that is My Drive, if we want to like our drive clean and sorted then we can change the location.
New Tab:- Untitled Document-Google Docs
Steps to Change the location
Single left-click on the Folder icon near the document name it will display the directory structure from here we can select the desired location if we do not find the desired folder and want to create a new folder then click on the new folder icon at the bottom left of this directory list-menu give a new name to the folder and click the right sign icon, folder is created now click “Move here” option at the bottom right corner of the menu to change its location.
Click Folder Icon:
Thank you note
Thank you for Watching, Like and Subscribe my videos on my YouTube Channel, leave your suggestions in the comment section below.
Read Blog for more Articles.
Reach me at
Email:- meetusdesk@gmail.com
Telegram ID:- @Meetus_Desk
Download presentations from SlideShare


